A backup is only as good as its recovery. Let’s make your Windows Server recovery predictable and successful.
When a system goes down, everyone looks to you to restore operations. Whether it's a bare metal recovery or restoring some deleted files, surprises in high pressure situations are undesirable. What you need is a well-trodden path. The right tools and procedures help you rise to the challenge.
Restore and Recovery
◆◆◆
Technical Deep Dive
We identified 19 different ways to recover a Windows Server – from system bare metal recovery, to file version restore, to email restore. These scenarios may not be obvious until users start asking for their data from backup.
We want you to have all bases covered. The rich set of restore and recovery tools provided by BackupAssist, together with well-defined step-by-step guides, will put you in good stead.
the right recovery
- Organizations grind to a halt.
- High pressure situations for administrators.
- Jobs are on the line if a successful recovery is delayed or impossible.
- Cyber-criminals win by extorting ransoms from hapless victims who have no choice.
- Figuring out the recovery process “on the run” is like learning to use a parachute after you’ve already jumped out of the plane. You might get lucky... you might not.

BackupAssist Classic
- Well defined recovery scenarios with step by step instructions from our Recovery Bible
- Repeatable procedures and clear decision flow-chart to help guide you through the process
- The right tools to get the job done
- Be cool, calm and collected when faced with getting data back from backup.
- Make sure everyone in the I.T. department can do the recovery, not just a single "guru".
What's in it for you
Backups are useless if you can’t get your data back.
So BackupAssist comes with the right tools and documented procedures to handle almost any restore and recovery situation you’re likely to face.
And they’re all documented in one handy book.
Full server recovery for physical servers:
1. Physical to Physical, Bare Metal Disaster Recovery (BMDR)
2. Physical to Virtual, Bare Metal Disaster Recovery
Full server recovery for Hyper-V environments:
3. Recover a Hyper-V Host and all guest VMs to new metal
4. Recover specific Hyper-V guest VMs to same host
5. Recover specific Hyper-V guest VMs to different host
File restore for physical machines:
6. Point-in-time search, browse and restore of files and directories
7. Search, browse and restore past versions of a file across all backups
File restore for Hyper-V guest VMs:
8. Point-in-time search, browse and restore of files and directories on a Guest VM from a backup of the host
9. Search, browse and restore past versions of a file on a Guest VM from backups of the host
Exchange Server restore and recover:
10. Recover entire Exchange Server from backup
11. Recover specific Exchange Database(s) from backup
12. Granular restore – specific mailboxes, emails, contacts, notes, etc. from a backup of Exchange in physical environment
13. Granular restore – specific mailboxes, emails, contacts, notes, etc. from a backup of Exchange in Hyper-V environment
SQL Server restore and recovery:
14. Full SQL Server recovery from a drive image or application backup
15. Point in time recovery of SQL databases
Restore without BackupAssist tools (only native Windows tools):
16. Restore from drive image backup
17. Restore from file replication backup
18. Restore from ZIP archiving backup
19. Restore from SQL backup

Try BackupAssist Classic to receive your free copy of the Recovery Bible and let’s make your recoveries predictable and successful !
HOW IT WORKS
We provide 2 core tools, and 3 specialized tools to get the job done.
For bare metal recovery from image backup, in physical and virtual environments


RecoverAssist

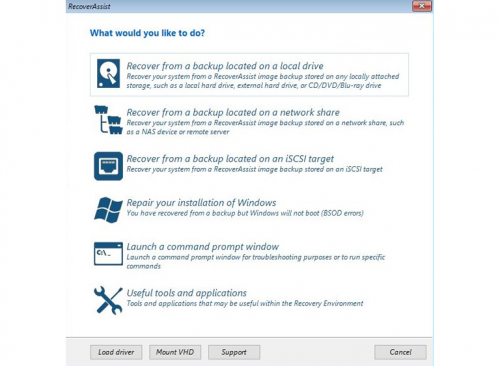
RecoverAssist is a bootable recovery environment that allows you to rebuild a server, when all you have some new hardware (or new virtual machine) and a drive imaging backup.
You firstly create yourself a RecoverAssist bootable media on a USB drive or ISO image.
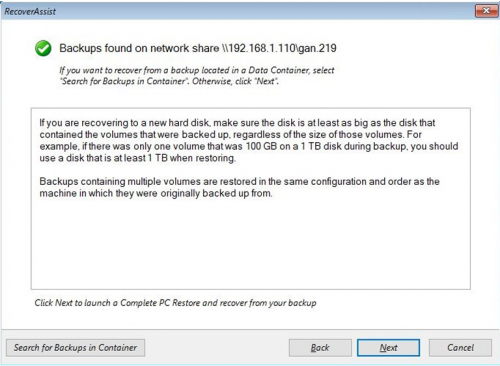
Then you boot that RecoverAssist media on the machine where you want to recover to. It guides you through the steps of locating a backup and starting a bare-metal recovery.
Using RecoverAssist, you can successfully recover to different hardware, avoiding blue-screen problems due to mismatching drivers. You can also install new drivers such as for RAID arrays.

Use RecoverAssist when you need to recover your entire machine, including data and configuration, from a backup. You will need to do this if your server is destroyed or stolen, or if a Windows Update or ransomware corrupted your system.
A recovery can be to the original server provided the server is still able to function. For example, if the hard disk or RAID array failed but was subsequently repaired.
You can also recover to a different server that has the same or even dissimilar hardware. For example, if the original server was stolen or lost in a natural disaster.

How do I use it?
1
2
- Detailed instructions and walk-throughs of all our tools are provided in the Recovery Bible.
An accounting firm has five servers that it uses for its applications, files, and emails. On Monday morning, several employees find a ransomware message on their PCs. When the IT team arrives, they find the same message on the servers and confirm that the firm has been infected by ransomware.
The firm’s PCs can be recovered using standard desktop SOE images, but the servers need to be recovered from backups. The firm uses BackupAssist Classic and has System Protection backups for each server. They check the backups and find that CryptoSafeGuard prevented the ransomware spreading to the NAS device where the backups are stored.
The IT team starts the process of recovering each server, starting with the domain controller. They use a bootable media created by BackupAssist to start the RecoverAssist environment, then use RecoverAssist to locate and select a backup. The recovery runs smoothly because RecoverAssist includes the required drivers, and the process is repeated successfully for each server.
- You create your own RecoverAssist media using our RecoverAssist Builder tool. We recommend creating one for each version of Windows that you support.
- Conveniently, BackupAssist Classic can install RecoverAssist onto your USB backup disks, so each backup disk will be bootable and ready for a bare-metal recovery.
- Allows you to add tools from a set of third-party recovery applications to the recovery environment.
- Allows you to add hardware drivers to the recovery environment so that specific storage devices can be supported.
- Includes a command prompt so you can run command line tools like diskpart.exe, bootsect.exe, and regedit.exe.
- Automatically adjusts the appropriate settings in Windows when recovering to different hardware.
- Avoids many blue screen of death (BSoD) problems that can occur when recovering using Windows.
- Supports backups located on hard drives, network locations, iSCSI targets, and VHD containers.
Integrated Restore console

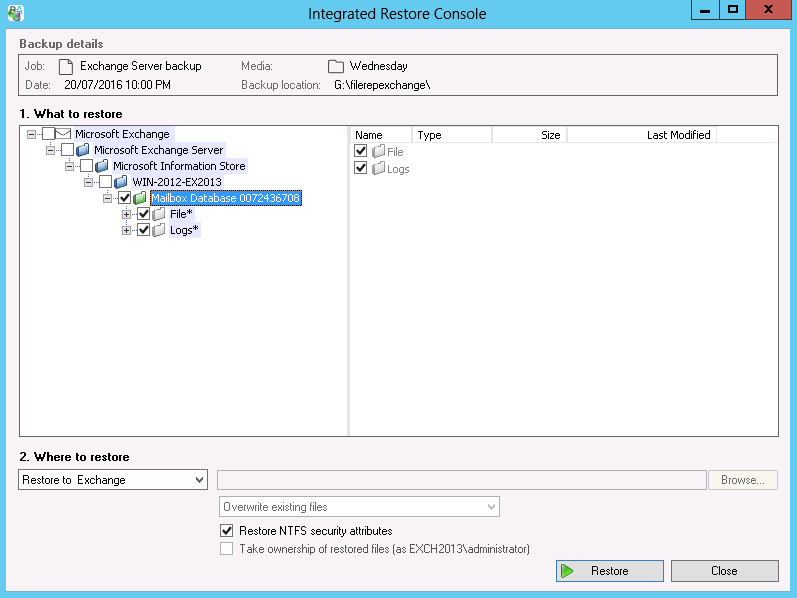
The Integrated Restore Console is your one “go-to” place for restoring files, and VSS applications (which include Exchange, SQL and Hyper-V).
From the Integrated Restore Console, you can browse and search for specific files, and even find all past versions of a file, from your past backups.
You can also restore VSS-enabled applications, such as Exchange, SQL and Hyper-V.
It doesn’t matter what type of backup you’re restoring from (drive imaging, cloud offsite, ZIP, etc.) – the same tool will restore data from them all.

There are many situations where you need to restore a portion of data from backup, like some files and folders, but not your entire system.
This is precisely when the Integrated Restore Console comes in handy. Use it when you need to restore:
- Local and Network Files
- Files inside Hyper-V Guests
- Exchange Server
- SQL Server

A legal firm has many revisions of an Outline of Case document. This document has so many revisions because it has been edited by multiple barristers, lawyers, expert witnesses, and the client.
Due to human error, two pages were deleted accidentally by someone in the chain, but no one knows when it happened. Change tracking within the document did not help.
The I.T. administrator is able to locate all past versions of the document from the firm’s File Protection backups, and restore 7 versions from the last month of daily backups. The administrator gives all 7 versions to the lawyer, who finds the missing pages easily.
The Restore tab’s search feature checks every backup and lists those that match the criteria you provide. For example, you could search for backups containing any PowerPoint presentation that was modified on a specific date.
If you want to use a backup created by another BackupAssist installation, you can use the Discover Backups option to locate that backup.
When you have found the backup containing the data you need, click on it and the Restore Console will open the backup. You can then select where you want to restore to, set the destination overwrite options, and browse through the backup’s contents. Once you have selected the files and applications, you can start the restore and watch its progress in real time.
- Detailed instructions and walk-throughs of all our tools are provided in the Recovery Bible.
- Restores VSS application data including Exchange Server databases and SQL Server databases.
- Supports encrypted backups and prompts you for the password before accessing the backup.
- Gives you the option to retain the NTFS attributes of the restored data.
- Allows you to take ownership of restored files.
- Searches your backups to see if they have the files you need, without needing to connect to them.
Exchange Granular Restore

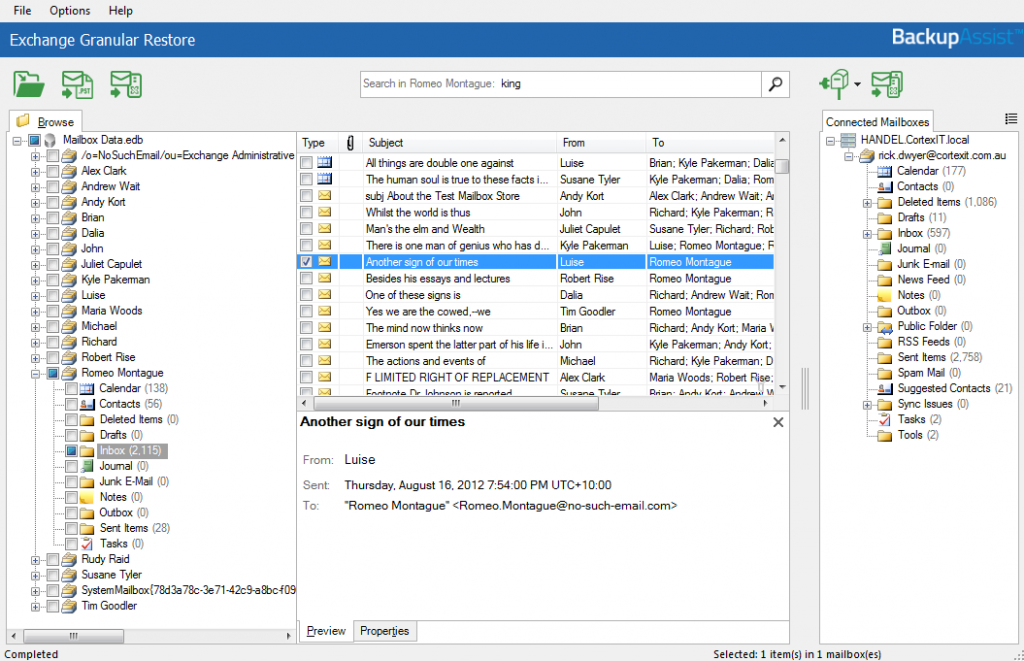
Exchange Granular Restore allows you to restore specific mailbox items from a backup of your Exchange Server. For example, if an employee needs a misplaced email or a deleted contact to be restored, this is the tool to use.
Locating mailbox items is easy with Exchange Granular Restore’s extensive search options, and the restore process is as simple as dragging and dropping a mail item into a mailbox.
You can restore to the original Exchange Server, a different Exchange Server, or to a PST file.

Use Exchange Granular Restore when you need to restore any mailbox items that have been deleted or misplaced. The items you can restore include emails, contacts, tasks, and calendar entries.
You can also use Exchange Granular Restore to recover an entire mailbox or to facilitate a mailbox migration.
All you need is a System Protection, File Protection, or File Archiving backup of an Exchange Server.

The company uses an Exchange Server that has a daily System Protection backup to a NAS. The IT department uses Exchange Granular Restore to access the previous Friday’s backup.
They are unable to find any emails matching the name provided, so they restore the account rep’s inbox from last Friday to a PST file and send it to him. They ask him to check if the email he lost is there, and he gratefully replies that it is.
Select Exchange Granular Restore from the Restore tab, click on the backup with the date you want to restore from, and select the required database.
Exchange Granular Restore will open the Exchange database (EDB) file from backup, and display all of the mailboxes that were on the Exchange Server at that time. You can browse through them to find the mailbox items you need, or perform a search of the mailboxes using detailed parameters. For example, you could search for all emails received by three members of the sales team with an attachment, during the previous week.
To restore the selected mail items, just drag and drop them into the target mailbox. You can restore items to any target mailbox on any Exchange Server simply by supplying the server’s name and mailbox credentials. You can also restore to a PST file.
- You can search the whole database or specific mailboxes.
- When you restore emails, RESTORED will appear in the Subject line. This feature can be turned off.
- Mail items can be restored into a live Exchange Server database or PST file.
- Exchange Impersonation is supported so you can restore mail items to any authorized mailbox.
Hyper-V Rapid VM Recovery

Rapid VM Recovery allows you to instantly recover a guest by booting your VMs directly from backup. This reduces the downtime of your VM guests to just a few minutes.
A normal VM recovery can take hours, depending on how large it is. With a Rapid VM Recovery, you can get back up and running quickly, and defer the full recovery to a more convenient time. All you need is a System Protection backup of the guest.
Please note that Rapid VM Recovery requires the Hyper-V Advanced Add-on.

Use Rapid VM Recovery when you need to recover a Hyper-V guest that provides an essential function and needs to be operational as soon as possible.
For example, a VM running Exchange Server, online ordering software, or acting as a domain controller.
This temporary solution provides business continuity until a suitable time can be found to perform a Full VM Recovery. When you perform a full recovery of the VM, all changes to the rapidly recovery VM can be included.

A software development company is working on an update for their android app. The update contains an important fix and the release date is the next day.
When the developers arrive to start work, no one can access their code. An investigation confirms that the VM containing the code repository is not responding, and attempts to resolve the problem fail.
The VM is backed up using System Protection, but because the VM contains a lot of data, it could take hours to perform a recovery. With only one day left for the developers to complete their work, they decide to use Rapid VM Recovery now and perform a Full VM Recovery in the weekend. The Rapid VM Recovery process is started and 10 minutes later, the VM is running from the USB drive it was backed up to, and the developers have resumed working.
A full recovery to a new host is planned for the night after the release.
Select Rapid VM Recovery from the Recovery tab, and you will see a list of all VMs that have been backed up. Click on the VM you want to rapidly recover, and all the backups for that VM will be displayed.
Then click on the backup that you want to use, and BackupAssist will prompt you to confirm that you want to use it for a Rapid VM Recovery. Once you provide confirmation, the VM will be prepared for a rapid recovery.
Open Windows Hyper-V Manger, and the VM will appear with the tag – Recovered. Use Hyper-V Manager to review the settings and start the VM, and it will run from the backup destination.
- Detailed instructions and walk-throughs of all our tools are provided in the Recovery Bible.
- You can have multiple VMs rapidly recovered at the same time.
- A Hyper-V host can rapidly recover a VM using a backup that was created by another Hyper-V host.
- RDX and Data Container destinations are not supported.
- Requires a System Protection backup of the VM.

SQL Point-in-Time Restore

A key feature is the ability to restore databases to a specific point-in-time, just before a database failed or encountered a problem. For example, if a power outage corrupted a database or if there were errors in a database’s transactions.

You can use SQL point-in-time to restore databases for a local or remote SQL Server.
If the backup job used a Transactional scheme (one full backup per day, plus frequent Transaction Log backups), the databases can be restored to a specific point in time anywhere between the first and last backups of the day.

In the middle of the day, the application crashes and stops accepting orders. The IT support team cannot get the application working, and its SQL database is believed to be the cause. They determine that the application went down at 1:22 p.m., and that the database is operational, so backups made after the crash can be used. Because a backup is created every 30 minutes, the backups closest to the restore point were made at 1:00 p.m. and 1:30 p.m. Using SQL point-in-time, 1:21 p.m. is selected as the restore point, and the backup from 1:30 p.m. is used to successfully recover the database. The application starts running again, and all orders placed after 1:21 p.m. are resent by the sales force. Business resumes with minimal time wasted.
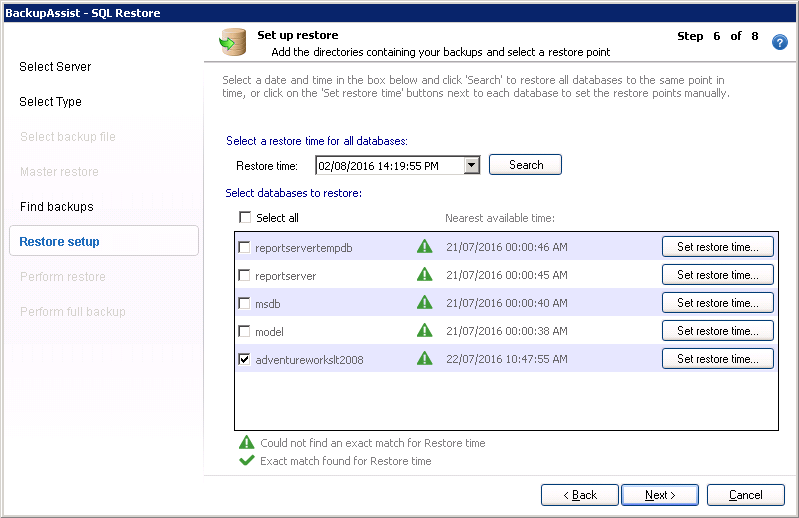
Select the SQL Server that you want to restore to, and enter the authentication information requested. The SQL Restore console will then connect to the SQL Server and guide you through the process of locating the backup directory.
For a point-in-time restore, you will be prompted to enter a restore time. All backups made close to this time are displayed, and you can choose the one that you want to use.
Then select the databases to be restored from that backup, and start the restore process.
- Detailed instructions and walk-throughs of all our tools are provided in the Recovery Bible.
- You can restore databases to a local or remote SQL Server.
- You can restore user databases or the master database (for the local SQL Server).
- The restored data will always be transactionally consistent.
- You can restore from both full database backups, and from a chain of transaction log backups. The SQL Restore GUI makes it easy and hides all the complexities.
- The SQL Restore console can be used to start a local SQL Server that has stopped running.
Frequently Asked Questions
What is bare metal recovery?
It’s when you need to recover an entire system from a backup. Here’s an example:- Your server is destroyed by fire. You have an offsite drive image.
- You buy a new server.
- Somehow you need to get data off your drive image backup onto the new server. That’s the process of bare metal recovery.
How do I perform a bare metal recovery?
You’ll follow the steps:- Boot off your recovery media. You can either create a RecoverAssist bootable recovery media on a USB stick, or make your backup disk bootable.
- Connect your backup. RecoverAssist can search for USB connected drives, or find backups on a network share or iSCSI device.
- Perform configuration tasks for your new system, such as including new drivers
- Kick off the recovery process
What are other names for bare metal recovery?
You’ll see many variations of names used in different places by different vendors. They generally mean the same thing! Here we go:- Bare metal disaster recovery (BMDR)
- System recovery
- System restore (different from System State restore)
- Image backup recovery
No – although RecoverAssist is quite similar to Windows RE, it does not have the same problems. Let’s delve deeper.
Depending on your version of Windows, you might experience different problems.
Under Windows RE, you may experience a “blue screen of death” (BSOD) after doing a bare metal recovery from drive image. This applies to all Windows versions, but especially for Windows Server 2008 and Server 2008 R2. The problem occurs when recovering to different hardware – if there is a mismatch between your storage device, the blue screen will occur. There can also be issues if you recover from physical to virtual.
RecoverAssist solves this problem by correctly instructing Windows to re-detect hardware devices after a reboot. RecoverAssist also allows you to include additional drivers in your Recovery Environment, and also to add drives at the time of your bare metal recovery.
This has the effect of giving you a successful and predictable recovery.
To restore deleted files, you’ll use the Integrated Restore Console.
From here, you can search and browse your backups. The Integrated Restore Console will automatically attempt to connect to the correct backup to restore data, or if the backup is not already connected, it will tell you which backup media to connect (e.g. if it is a USB Hard Drive or Tape).
Your path to cyber-resilience
Take the 30-day Trial of BackupAssist Classic for free!
Within 30 days not only will you have successful backups, but you should also have performed several test recoveries.
We’re here to help.
Ping us here on instant chat (US Eastern hours), or submit a support ticket online.
There aren’t many questions we can’t answer!
