 Belgium
 Canada
 Germany
 Italy
Italy France
 Spain
Spain United Kingdom
SNAP Server Backups
Using BackupAssist with SNAP Servers and other NAS DevicesContents
- Introduction
- Authenticating to your SNAP Server
- Using the SNAP Server as a Destination Backup Device
- Using The SNAP Server As A Source Of Data
Important Notice
The information and instructions contained within this document are specific to BackupAssist v3.x.x. While some of this information will be valid for other versions of BackupAssist we do not support the application of any steps or suggestions on versions other than v3.x.x
Documentation specific to BackupAssist v4 will be available very soon and we appologize for any inconvenience.
Introduction
BackupAssist can be used with SNAP Servers and other NAS devices in two ways:
- Using the SNAP Server as a destination backup device: BackupAssist can backup your Windows Server (files, directories, Exchange, SQL, etc) and store the backup file onto a SNAP server.
- Using the SNAP Server as a source device: BackupAssist can backup data from a SNAP server to tape, REV, Hard drive, or backup file.
This White Paper discusses exactly how to setup BackupAssist to use the SNAP server in the two scenarios listed above.
Please note: In this White Paper, the term SNAP Server is used to describe NAS devices manufactured by SNAP Appliance. It is also used as a generic term to describe NAS devices produced by other manufacturers as well.
Authenticating to your SNAP Server
The first step is to setup BackupAssist to authenticate to your SNAP server before each backup. To do this:
- Go into your backup job, and click 'Advanced'.
- Click 'Modify scripts to run before and after the backup'
- Type in the following:
Where:
server is your computer (workstation) name.
username is a user on your workstation.
password is the password for that user.

Hint: Using an IP address for your server name will make the process more reliable because it removes the dependency on your DNS or WINS server for name resolution.
Using the SNAP Server as a Destination Backup Device
Example Scenarios of Usage
On Windows 2000 and later, BackupAssist can perform the backup of your Windows server to a single backup file. This file can then be placed onto your SNAP server.You may have several reasons for this. For example, you may choose to have multiple backup jobs - one to a conventional backup device (such as tape), and another onto your SNAP Server. The SNAP Server can be used to store daily backups of your critical data, thus making it easy and convenient to do a restoration, as your data is always online (whereas your tape may be stored offsite).
Alternatively, you may choose to store the SNAP server offsite and connect to it via a VPN.
How To Setup BackupAssist
There are two ways you can setup BackupAssist to perform the backup to a SNAP server:
- Backup your data to a local temporary directory, and then copy the backup file to your SNAP Server (recommended).
- Backup your data to the SNAP Server directly
Option #1 is recommended, as the backup process will be quicker and more reliable. However it requires enough free space on your hard drive to store the backup job.
Option #2 is less reliable because if network connectivity fails any time during the backup process, the entire backup job will fail. It is common for the 'average' network to experience some disruption to network connectivity over several hours - although this goes unnoticed to the user, it will often cause a disruption to the backup job.
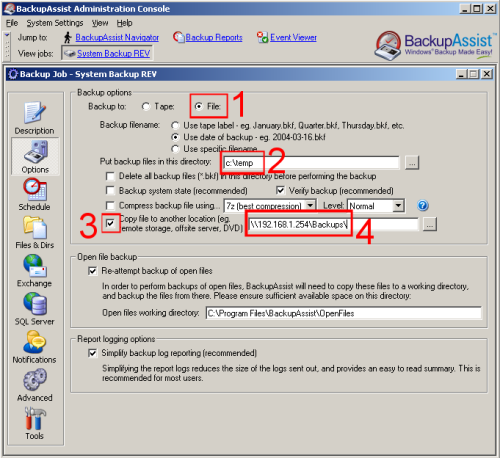
Setup procedure for Option #1
Important: Ensure that you have followed the steps in the section Authenticating to your SNAP Server. If you skip this step, your backup will not work.
Now go to the options tab, and do the following - please refer to the screenshot below:
- Select to backup to file, and choose your backup filename.
- Enter in the path of a temporary directory.
- Check the checkbox titled Copy file to another location.
- Type in the path on your SNAP server where you want the backup to be placed.
Setup procedure for Option #2
- Select to backup to file.
- Enter in the path of your SNAP server where you want the backup to be placed.
- Leave this checkbox unchecked.
- Leave this textbox empty.
Using The SNAP Server As A Source Of Data
Example Scenarios of Usage
You may use a SNAP server as a shared file server for your workgroup or domain. You now wish to backup the data on your SNAP server to another backup device, such as tape, REV or removable hard drive.How To Setup BackupAssist
Important: Ensure that you have followed the steps in the section Authenticating to your SNAP Server. If you skip this step, your backup will not work.
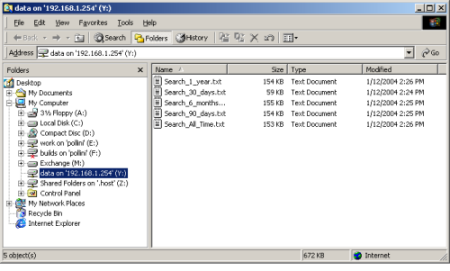
- In Windows Explorer, map your SNAP server as a drive. In the example below, the SNAP server is mapped as Y:. Hint: Using an IP address for your SNAP server makes the process more reliable, and removes the dependencies on the DNS or WINS server for name resolution.
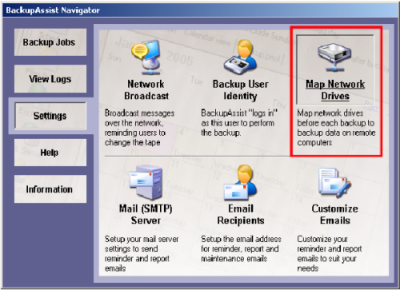
- In BackupAssist, go to the Navigator > Settings > Map Network Drives as shown. Now add your newly mapped drive to the list of mapped network drives. Be sure to use a valid username and password for your SNAP server.
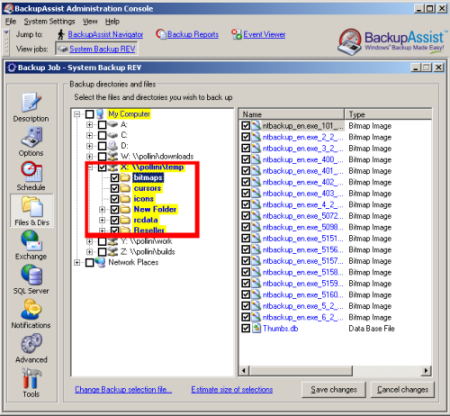
- Now go to the backup job in BackupAssist, and the Files & Dirs tab. Select the data you want to backup from your SNAP server. In the example, the entire X: share has been selected for backup by clicking on the checkbox (highlighted in red).
Note: An alternative method of backing up the data on your SNAP server is to backup using the UNC path for your server in the format of \\server\share\.
To find your server, click under Network Places, and locate your domain or workgroup and your SNAP server.

