Belgium
 Canada
 Germany
 Italy
Italy France
 Spain
Spain United Kingdom
SQL Server Backups
Online SQL Server Backups Using BackupAssistContents
- Requirements
- Introduction
- How the SQL Backup Works
- Setting up BackupAssist For Online SQL Server Backups
- Backing Up A Remote SQL Server
- BackupAssist Settings
- SQL Server Logon
- Selecting Your Databases To Backup
- SQL Backup Directory
- Backing Up Remote SQL Servers
- Checking the Backup Logs
- How to Restore a Database
Requirements
- BackupAssist v3.x.x
- Windows NT, 2000, XP or 2003 Server
- Microsoft SQL Server 7.0 or later
Important Notice
The information and instructions contained within this document are specific to BackupAssist v3.x.x. While some of this information will be valid for other versions of BackupAssist we do not support the application of any steps or suggestions on versions other than v3.x.x
Documentation specific to BackupAssist v4 will be available very soon and we appologize for any inconvenience.
Introduction
BackupAssist will perform live, online backups of your SQL Server databases and include these backups in your overall backup job (together with your files, system state, and/or Exchange server).
These SQL Server backups are in the standard SQL Server Backup Format - meaning that you will be able to perform a restoration on any SQL Server, without any additional software.
You may also restore individual databases to different SQL Servers as well.
How The SQL Backup Works
BackupAssist will log into your SQL Server and perform a backup to a backup file. This file is then transferred to your backup device (tape, hard drive, network server, etc.)

This design gives you maximum flexibility when you need to do a restoration, because your SQL Server does not need access to your tape drive (or other backup device). All you need to restore a database is the SQL Database Backup File. With the SQL Database Backup File, you can also perform advanced operations like recovery using the SQL Server transaction logs for point-in-time restorations (Advanced SQL Server database administrators will be familiar with this).
Setting up BackupAssist For Online SQL Server Backups
Important - If You Are Backing Up A Remote SQL Server
If you are backing up a remote SQL Server, you need to install the SQL Server Client Tools on your backup computer. This will install the libraries needed to communicate to your SQL Server.BackupAssist Settings
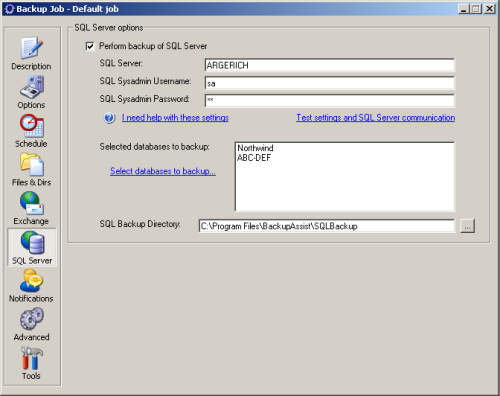
The SQL Server settings in BackupAssist are found on the SQL Server tab in your backup job.
SQL Server Logon
BackupAssist requires a valid SQL Server logon to backup your databases. This logon must use SQL Authentication. Most installations include a 'sa' user, and this is the recommended user.If in doubt, please refer to the online HTML Help file that is installed with BackupAssist. Detailed instructions are given on how to setup a valid SQL Server logon to perform the backups.
Selecting Your Databases To Backup
To select your databases to backup, click the 'Select databases to backup...' and check the databases to backup.SQL Backup Directory
The SQL Server databases are backed up to this directory. You should ensure that this directory has sufficient disk space to backup the databasesFor local SQL Server backups
Any local hard drive or directory with plenty of free space will do.For remote SQL Server backups
Please review the following section Backing up remote SQL serversBacking Up Remote SQL Servers
If you want to backup a remote SQL server with BackupAssist you will need to carry out the following steps:Step one: Install the SQL server client tools on both the SQL server machine and the Backup server machine
- Install the client tools from the SQL Server Installation CD
- Choose to install the database server
- You may receive an alert message if your Operating System does not support the SQL Server installation - just click 'OK'
- Choose to install the client server tools
- Select the type of installation - if you are installing on the backup server, you only need to install the client tools
Step two: Create a network share that both the SQL server and Backup server have access to
- It is best to create the network share directory on the actual SQL server itself to avoid any authentication issues between the SQL server and the Backup server. For example: create a new directory on your SQL Server in C:\SQLBackup, and then share that directory with the share name of SQLBackup. Assign your backup user full permissions for that share, and full NTFS file permissions as well.
- Since a Backup User Identity is defined with BackupAssist which is used to logon and perform the backup, as long as that user has permissions/access rights to write and read from the SQL shared directory you will have no problems backing up to and from this directory.
Tip: If you're concerned about security, and creating an extra share for your SQL server backups, then you can make the share hidden by adding a $ to the end of the share name. For example, a share called SQLBackup$ will be hidden, meaning that people viewing your server in the Windows Explorer won't be able to see that share.
Step three: Now setup BackupAssist to backup your remote SQL server
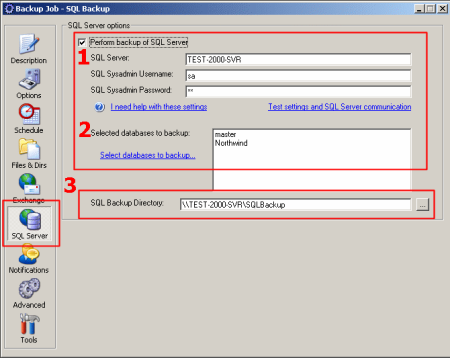
- Access the SQL server tab of BackupAssist (below screenshot)
- Enter in the server details and authentication information of your SQL server (eg. the name of the remote server you are backing up from)
- Select the databases you wish to backup
- Enter in the network share directory you defined earlier that both your Backup server and SQL server have access to into the SQL Backup Directory field.
- Ensure that you enter the directory in UNC format as follows:
\\ServerName\ShareName
In this case: \\TEST-2000-SVR\SQLBackup
Checking the Backup Logs
BackupAssist will report the success of each backup in the backup logs. A section entitled 'SQL Server Backup report' will be created in each report. An example of a successful backup operation is shown below:===============================
SQL Server Backup report
Backup of database Northwind succeeded:
Processed 320 pages for database 'Northwind', file 'Northwind' on file 1.
Processed 1 pages for database 'Northwind', file 'Northwind_log' on file 1.
BACKUP DATABASE successfully processed 321 pages in 1.283 seconds (2.044 MB/sec).
Backup of database ABC-DEF succeeded:
Processed 80 pages for database 'ABC-DEF', file 'ABC-DEF_Data' on file 1.
Processed 1 pages for database 'ABC-DEF', file 'ABC-DEF_Log' on file 1.
BACKUP DATABASE successfully processed 81 pages in 0.520 seconds (1.262 MB/sec).
===============================
How To Restore A Database
Restoring a database is a two step process:
- Retrieving your SQL Database Backup File from your backup media
- Restoring your database from the backup file.
Step One: Retrieving Your SQL Database Backup File
The first step is to use Windows Backup to restore your database file.Please note: detailed instructions on how to use Windows Backup are beyond the scope of this White Paper. Please refer to the Restoring Files Using Windows Backup video training and White Paper documentation.
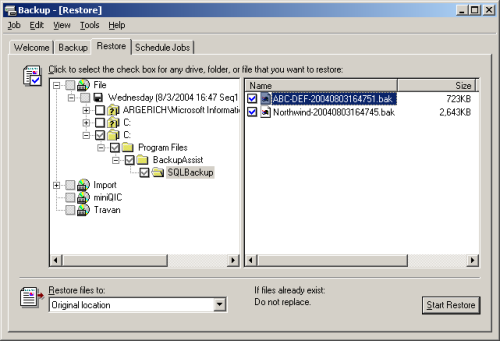
The SQL Database Backup File will be listed under the directory that you selected as the SQL Backup Directory. If you are restoring the database on a remote server, then copy this file over to your SQL Server.
Step Two: Restoring Your Database
The next step is to use the SQL Server Enterprise Manager to restore your database. Step by step instructions are given here to guide you through the process.Please note: the screenshots shown here come from SQL Server 2000. They may vary for different versions of SQL Server.
i) Run the SQL Server Enterprise Manager
Run the SQL Server Enterprise Manager from the Start Menu. Then expand the view in the left hand side, until you see your database server and databases listed.
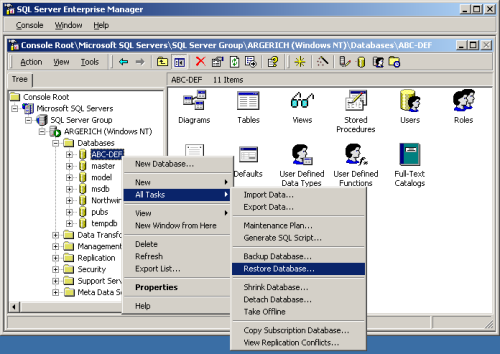
Now right-click below the Databases branch, and select All Tasks > Restore Database...
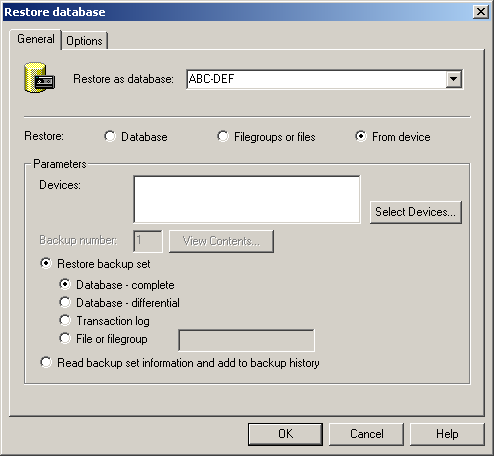
ii) Fill in the Restore database window
When you restore the database, you can choose what to call the new database. If you need to restore it to a different database name, you can type it in the section 'Restore as database:'.Just below it, choose to restore From Device, and then click the 'Select Devices...' button.
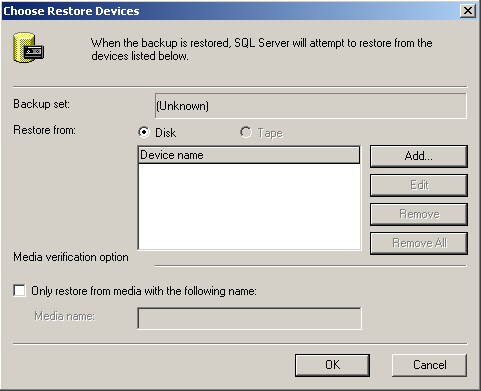
iii) Select your SQL Database Backup File
Choose to restore from Disk, and then click the Add button as shown below. You'll then be able to choose your backup file.
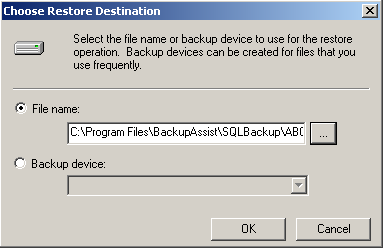
To locate your file, click the '...' button. Then navigate to find your SQL Database Backup File. This is the file that you restored in Step 1.
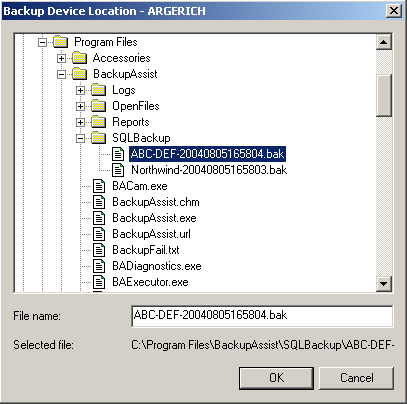
Simply click 'OK' until you get back to the Restore Database window.
iv) Fine tune your options
Back in the Restore database window, you can select the Options tab to fine tune your restore options.
If you are restoring over an existing database, you should check the 'Force restore over existing database' checkbox
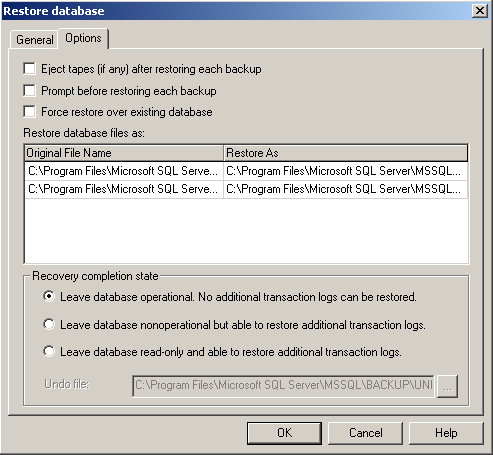
If you are restoring the database to a new database name, then you should also explicitly name your database files. You should review and modify the entries under the 'Restore As' heading as displayed in the screenshot above.
For advanced administrators: you may want to roll forward your database using the transaction logs - set the appropriate Recovery completion state to suit your needs.
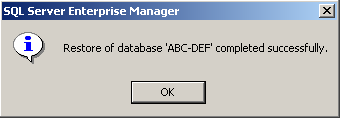
v) Click OK to restore the database
Assuming that everything has been setup properly, your database will be restored, and you will receive a success message such as the following.